[SignalR] Websocket 即時聊天程式(一) - 建立專案
這個系列會官方文件為主,保留必要的部分,並視情況修改部份程式、添加說明文字。
建立 SignalR 專案
這個範例設定用靜態 html 做前端,這樣之後要做前後端分離也更容易一些,之後會用到 web api 請求登入 Token,所以起始一個 web api 專案:
# 建立專案
dotnet new webapi -o SignalR
# 以 VS Code 打開專案
code -r signalr
建立 SignalR 中樞
在.NET Core 3.1 當中使用 SignalR 伺服器端不再需要安裝額外的套件,直接將 SignalR 注入服務容器就能使用, SignalR 的 Hub 中文名稱就叫做中樞,在專案中新增資料夾 Hubs 用來專門存放 Hub 實作類別,並在 Hubs 中新增檔案 ChatHub.cs,內容如下:
using Microsoft.AspNetCore.SignalR;
using System.Threading.Tasks;

namespace SignalR.Hubs
{
    // 這就是所謂的 SignalR 中樞
    public class ChatHub : Hub
    {
        // 這是提供 Client (js)端呼叫的方法,後面是這個方法接受的參數
        public async Task SendMessage(string user, string message)
        {
            // 針對每個以連線的客戶端呼叫 ReceiceMassage 方法,並傳送參數 user、message
            await Clients.All.SendAsync("ReceiveMessage", user, message);
        }
    }
}
設定 Startup.cs
依照官網的設定,在 Startup.cs 當中新增第13, 30,42-43 ,52 行:
using SignalRChat.Hubs;:新增對 Hub 的引用。service.AddSignalR():將 SignalR 相關對應註冊在 service container 中。app.UseDefaultFiles():讓程式自動傳送路徑下的 index.html,必須要在app.UseStaticFiles()之前設置。app.UseStaticFiles():讓程式自動傳送 wwwRoot 下的檔案。endpoints.MapHub<ChatHub>("/chathub");:將 ChatHub 中樞綁定到站台的 /chathub 端點。using System; using System.Collections.Generic; using System.Linq; using System.Threading.Tasks; using Microsoft.AspNetCore.Builder; using Microsoft.AspNetCore.Hosting; using Microsoft.AspNetCore.HttpsPolicy; using Microsoft.AspNetCore.Mvc; using Microsoft.Extensions.Configuration; using Microsoft.Extensions.DependencyInjection; using Microsoft.Extensions.Hosting; using Microsoft.Extensions.Logging; using SignalR.Hubs; namespace SignalR { public class Startup { public Startup(IConfiguration configuration) { Configuration = configuration; } public IConfiguration Configuration { get; } // This method gets called by the runtime. Use this method to add services to the container. public void ConfigureServices(IServiceCollection services) { services.AddControllers(); services.AddSignalR(); } // This method gets called by the runtime. Use this method to configure the HTTP request pipeline. public void Configure(IApplicationBuilder app, IWebHostEnvironment env) { if (env.IsDevelopment()) { app.UseDeveloperExceptionPage(); } app.UseHttpsRedirection(); app.UseDefaultFiles(); // 使靜態檔案路徑預設指向 index.html app.UseStaticFiles(); // 啟用靜態檔案 app.UseRouting(); app.UseAuthorization(); app.UseEndpoints(endpoints => { endpoints.MapControllers(); endpoints.MapHub<ChatHub>("/chathub"); }); } } }
安裝前端相依性
LibMan
LibMan 程式庫管理員可從獲取前端所需要的相依性,來源包含檔案系統(File System)或CDNJS、jsDelivr、unpkg 等等內容傳遞網路(CDN),如果前端以其他框架(ex: Angular、React、Vue)開發時就需要用其他方式,這裡先用微軟提供的方便工具安裝需要的套件。
dotnet tool install -g Microsoft.Web.LibraryManager.Cli
@microsoft/signalr
以下指令 LibMan 會從unpkg將套件 @microsoft/signalr@latest 安裝到專案下的路徑 wwwroot/js/signalr 當中
libman install @microsoft/signalr@latest \
  -p unpkg \
  -d wwwroot/js/signalr \
  --files dist/browser/signalr.js \
  --files dist/browser/signalr.min.js
前端程式碼
HTML
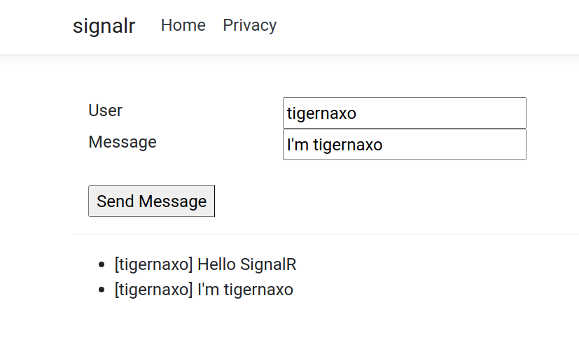
新增檔案 wwwRoot\index.html,內容如下:
<!DOCTYPE html>
<html>
<head>
<meta charset="utf-8" />
<title></title>
</head>
<body>
<div class="container">
<div class="row"> </div>
<div class="row">
<div class="col-2">User</div>
<!-- 使用者名稱輸入框 -->
<div class="col-4"><input type="text" id="userInput" /></div>
</div>
<div class="row">
<div class="col-2">Message</div>
<!-- 訊息輸入框 -->
<div class="col-4"><input type="text" id="messageInput" /></div>
</div>
<div class="row"> </div>
<div class="row">
<div class="col-6">
<!-- 送出按鈕 -->
<input type="button" id="sendButton" value="Send Message" />
</div>
</div>
</div>
<div class="row">
<div class="col-12">
<hr />
</div>
</div>
<div class="row">
<div class="col-6">
<!-- 顯示訊息的ul -->
<ul id="messagesList"></ul>
</div>
</div>
<script src="./js/signalr/dist/browser/signalr.js"></script>
<script src="./js/chat.js"></script>
</body>
</html>
JavaScript
新增一個檔案 wwwRoot/js/Chat.js
"use strict";
// 起始一個 SignalR 連線,連線到 /chathub 端點
let connection = new signalR.HubConnectionBuilder().withUrl("/chatHub").build();
// 從 Dom tree 當中取得送出按鈕、使用者名稱輸入、訊息輸入元件
let btnSend = document.getElementById("sendButton");
let userInput = document.getElementById("userInput");
let messageInput = document.getElementById("messageInput");
// 使送出按鈕無法點選,直到 SignalR 連線建立
btnSend.disabled = true;
// 註冊連線接收到 ReceiveMessage 時的行為
// 這個行為會呼叫帶有參數 user, message 的回呼函數
connection.on("ReceiveMessage", function (user, message) {
// 將&、<、>取代為相對應的 html code
var msg = message.replace(/&/g, "&").replace(/</g, "<").replace(/>/g, ">");
// 設定顯示文字、新增一個顯示對話的 li dom 插入至 messagesList
var encodedMsg = "[" + user + "] " + msg;
var li = document.createElement("li");
li.textContent = encodedMsg;
document.getElementById("messagesList").appendChild(li);
});
// 設定連線建立時的行為,將送出按鈕啟用
connection.start().then(function () {
btnSend.disabled = false;
}).catch(function (err) {
return console.error(err.toString());
});
// 設定按下送出訊息的行為
btnSend.addEventListener("click", function (event) {
// 以參數 userInput、messageInput 的值作為參數呼叫 server 端的 SendMessage
connection
.invoke("SendMessage", userInput.value, messageInput.value)
.catch(function (err) {
return console.error(err.toString());
});
// 取消 html 按鈕執行預設行為
event.preventDefault();
});
測試
dotnet watch run -p signalr.csproj

錯誤處理
附錄一下實際上沒有遇到,但官方有提到兩個錯誤的處理方法,按 F12 打開開發人員工具後檢查錯誤:
Chat.js 404 not found…
單純就是 Chat.js 放錯路徑了…
ERR_SPDY_INADEQUATE_TRANSPORT_SECURITY
用以下指令清除、重新生成開發期的 https 憑證(dotnet 版本 3.1.403 實際測試官方給的指令 dotnet dev-certs https --trust 沒有作用,是因為沒有 –trust 選項可以用)
dotnet dev-certs https --clean
dotnet dev-certs https
